Friday, 27 July 2012

2012 Mecha Contest Entry: Legend Gundam Part 9

Hey peeps.. I am terribly sorry for my lack of update ..... Why no update u ask?? well, this should explains it - A Modeller's Innovation: Why The Bird Has been InActive lately

Well, For what its worth, I have an update for all my comrades, seniors and juniors.... had to squeeze what amout of free time I have to steadily push forward to the completion of this kit ...
When I left off, I left off right where I was building the back pack yes? So lets just start from there - I made up a mock up for you guys last time, which is this - 

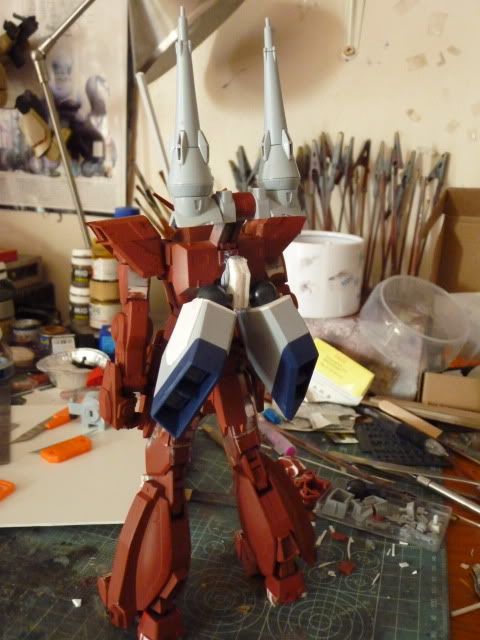
so, I now have to start making up the dragoons attachment binders. This was done by first, stacking plates like so -


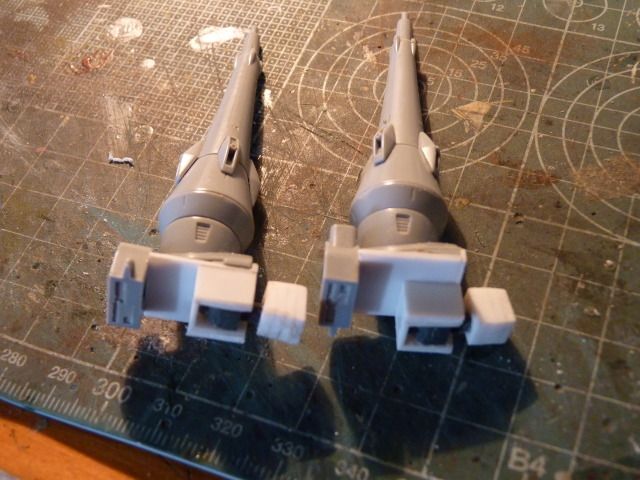
And after brain-storming and digging into two of my spare parts boxes - I achieved this 


The little black thingys are from the original backpack, cut off from the round thingy and closed on the sides with some plates. The yellow part is from my FG Kyrios ... and the little angled parts is the knee armor of my HG S gundam .
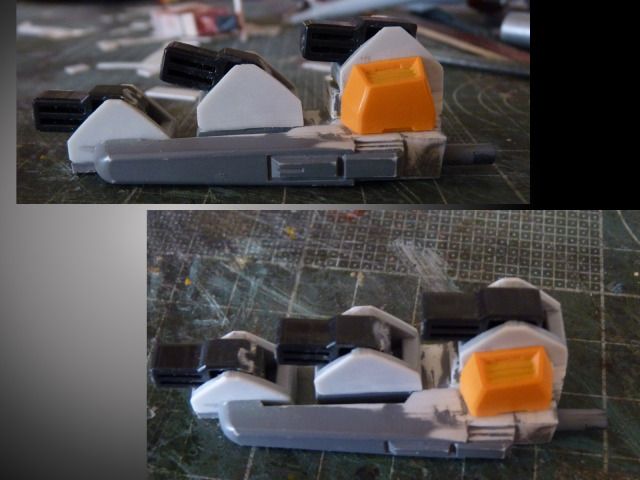
If you look to the right, you will see a rod (sprue) sticking out... That is put in there so that I can attach the binders into my main backpack -Which are these two- 


As you see, I already demonstrated there where those runners will go.. And then, I made some vents for those two parts and glue it on -


The binders are put on to see if there is any restriction of movement ....and once put together, they can do this -

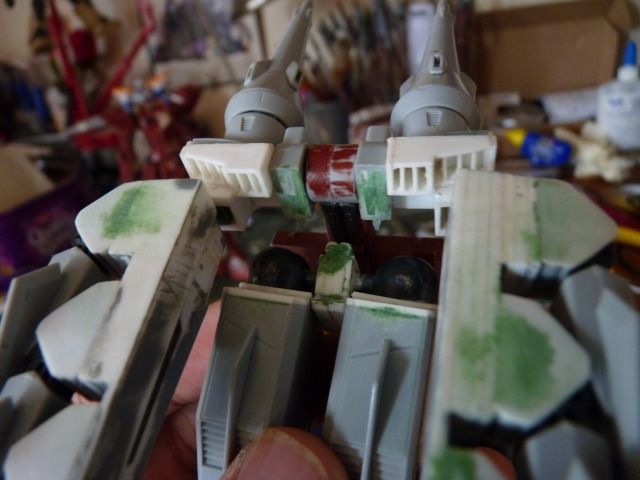
And if it is not being used, they can be folded back and stored like this -

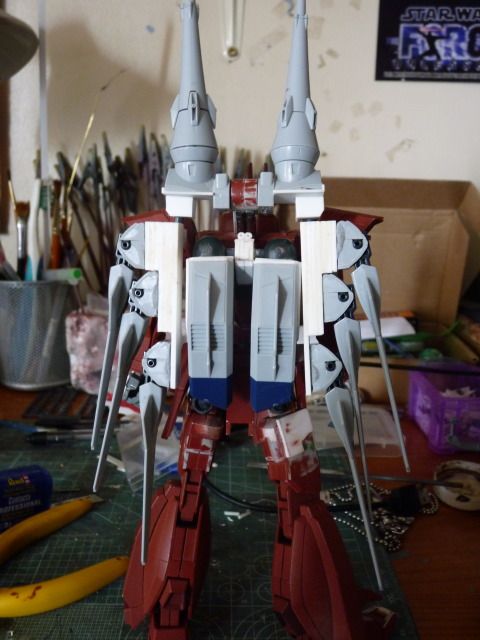
Now I really love this one as I really hated the overly large round original back pack.. but this, me likey.. (LOL).. 
And I never liked the original gun.. its too long and just too cumbersome...  so I made a better version ... Still in progress though-

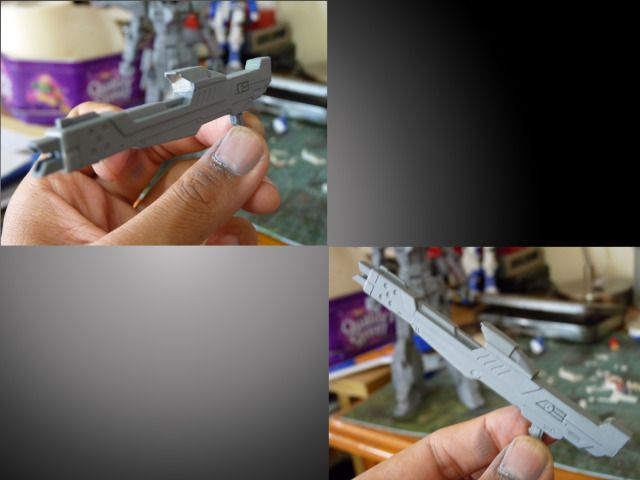
And as you all know, when it comes to detailing, I suck, so I tried my best to do what I can for the details -

I asked my friends around and they said I there is already enough plates and that I should start putting in panel lines .. SO here it is - 

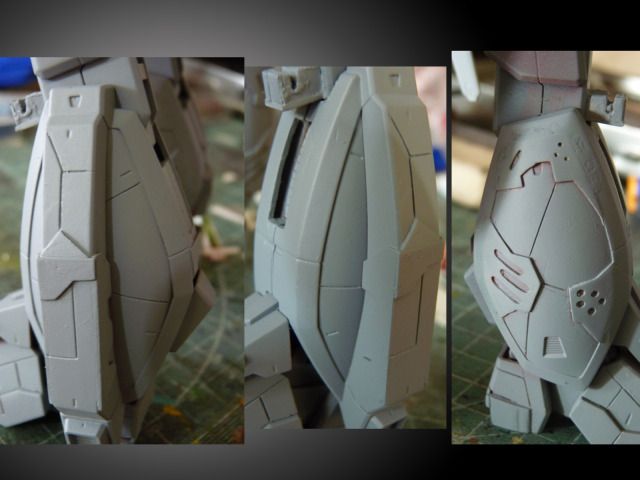
I also put some on the feet as well -

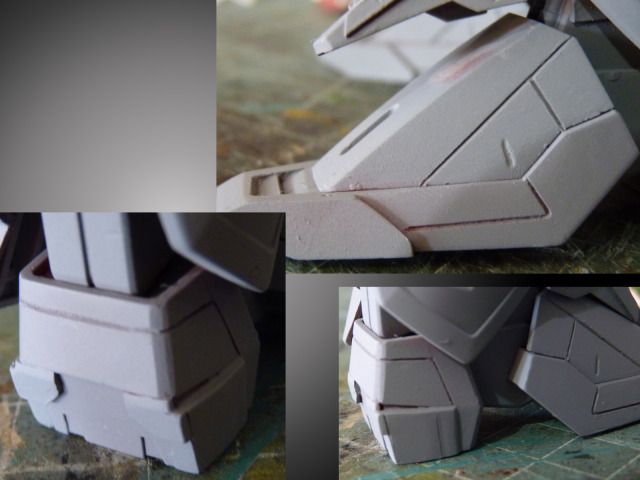
and some on the thighs ( I REALLY NEED TO DO MORE CLEAN UP ON THE THIGHS ''sigh '' )

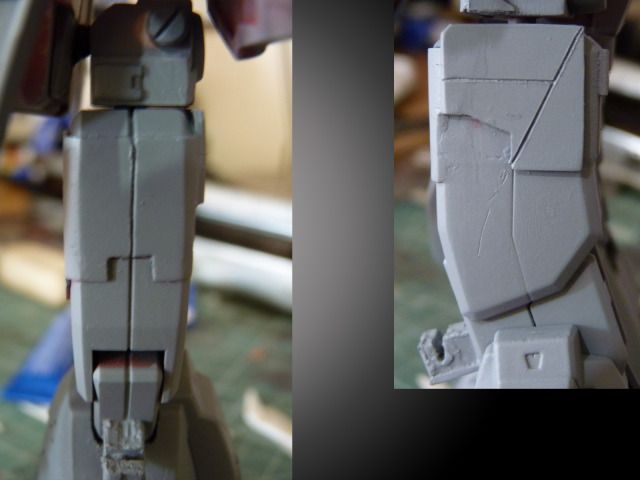
Following up on the head with my usual way of covering up seams- 

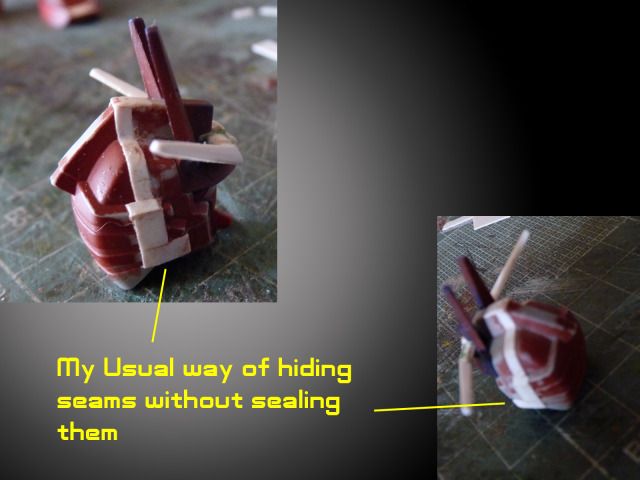
I was looking around and I found the shoulder flap ''bare'' so I decided to put some bits and bots there -

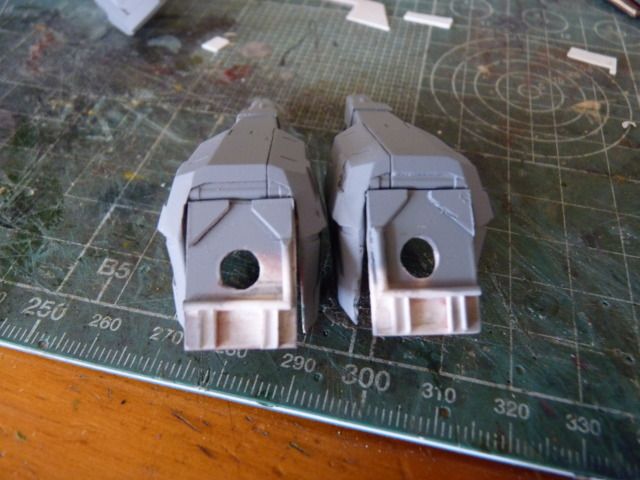
AND this is how it looks now in its primed stage-

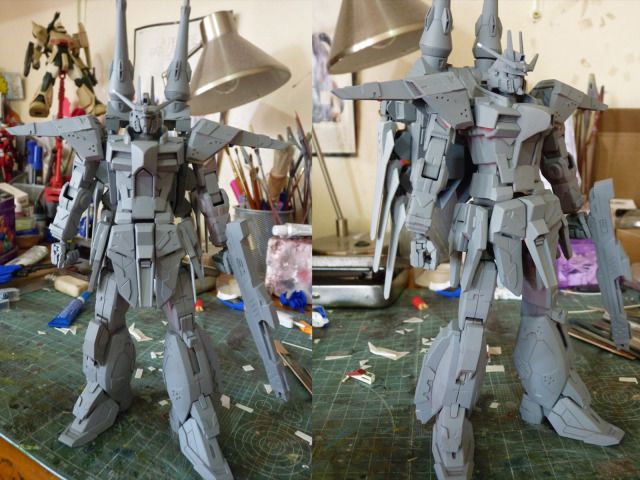
I only have to do MORE( a lot MORE) clean up and add details and bits and bots and we are done... ( I think)..

AND I CANNOT STRESS ENOUGH THAT I AM AWARE OF THE CLEAN UPS

I'm sorry I can't do any more ''big'' update ... Im not rushing but Im kinda running on fumes on this one so these would be all the major works on this... 
As usual, thank to you all for the support and reading..... 
Stay Tuned 
Read more >>

Friday, 22 June 2012

Why The Bird Has been InActive lately


Hello There Folks. I guess its about time I start explaining what's going on with my life and WHY in the hell I have been so inactive when it comes to modelling and blogging SINCE early April.

Well, folks, The answer is pretty Simple. Yours Truly has finally land himself a job. After being Jobless for 1 whole year after graduating in 2011, I have a job.

But don't get too excited, Its just a small time job. I got in a receptionist in a Branch of a Hilton here in London. Started from Apr 10 and I was swamped with training and full time that I couldn't even touch my models.

To make it worse, OR better, there was an opening for a night auditor position and I knew I had to take it when an opportunity arise. Sure a night shift really messes up my time table but as a night auditor, I get paid more and also, I can have a better position to put down on my CV. Not to mention, this can also secure me a good foot hold IF I wanted to venture out into the Finance field.

So basically, I had to leave my house at 9pm, get back home at 8 am and had to sleep and the circle continues. That is why I have been SOOO quite these days.

But rest assured, I haven't quite the hobby yet and yes, I still build and with the money coming in, I plan to build more.

In the mean time it's taking me to adjust to my working life, I sincerely apologize for my lack of activity and I hope you guys will understand and bear with me in this time of adjustment.
Thank you guys and love you all.

Read more >>

Tuesday, 19 June 2012

2012 MECHA CONTEST Extended for 30 more days !!


Dear Participants of the 2012 MECHA CONTEST -
2012 MECHA CONTEST will be extended until the end of July. As Kamm and Sneeper, the brains and organizer of the Mecha Contest , have decided the most awaited contest has been moved for everyone's delight.

The Main reason to extend was just that there have been a number of confusion with the venue change and everything became kind of not very convenient for all the participants for  2 week and Kamm, Sneeper and the rest of the gang thought we should extend it until the end of July as a mean of compensation for the inconvenience caused by the events of early may.

SO the contest is now extended a further 30 days until July 31.

That's good news for all modelers and aspiring ones to finish up their in-progress wips OR make a new fast one. Just be sure to send those entries and finished those in time. You have more than a month to enjoy your WIPs..So keep the ball rolling. Keep on churning out those  awesome kits and we will be waiting for your outstanding entries!!


Good Luck and more power to all participants!! Interested parties can still join the contest. There are lots of great prizes to be won.So what are you all waiting for.... SIGN UP and enjoy!!

You can check out and visit our new ''HOME''  -

Read more >>

Friday, 11 May 2012

How to Hand-Paint Mecha/Gunpla

Greetings my readers and my fellow modelling enthusiasts. Welcome to another post from the hummingbird.

First of all, I would love to apologize for my lack of update on my blog. 


Its just that I have been jobless for the past year and now, I got a job .. ( well, its only a hotel receptionist job and its kinda feel awkward for a material science grad to be doing this kind of work but what can I do in this time :/ ) and I was busy with training and the manager keep giving me shitty rota that I can't even touch my models any more but don't worry, I haven't quit the hobby yet. So, Sorry for the lack of updates.. I will update after I have adjusted my life.. 


Right, onto the main feature of this post ... I would like to feature a video from a  dear friend who is also brother from another mother and also a leader ( when we play online games). And that said person is no other then Mr. Kamm, the Hand Painting Assassin himself. 


As you all know, Hand Painting Assassin paints all his models by hand brush and he has generously made a video tutorial about how he hand paint his models. 


Without further ADO, I present to you, ''' How to hand paint Gunpla/Mecha ''' tutorial from the Hand Painting Assassin himself.... So do enjoy .. .and don't forget to like, comment or subscribe to Kamm's channel...... 


Hope that was helpful to you... it was helpful to me.. but sadly, I have given up hand painting... :P ....
Hope you enjoyed this giant tutorial from a great modeler ( and a great guy to boot) ...
Don't forget to  like, comment or subscribe to Kamm's channel...... Stay Tuned until next post .


Read more >>

Tuesday, 3 April 2012

2012 Mecha Contest Entry: Legend Gundam Part 8


Yosha ... The Bird is back.... I am sorry guys ... Life just wasn't kind on me .. LOL .. but that won't stop me from modeling... not only just life, I was focusing on the Gold frame and the Xbone that I didn't work on this ... I kinda need a break from ''Amaimon'' as well,, as you all know, modding takes its toll on the mind and body, but now, I'm back ...

Right... lets get cracking shell we??
First, I draw some panel lines on the back skirts -

It looked so plain and I didn't put on that big a piece of platings so I decided to go through with panel lines

did the same thing for the front skirts but since the front skits have bigger pieces of plates, I just went through with small panel lines -

I'm pretty happy with that much amount of details on it.. I don't want to go ever board ...
Also, I fixed the feet. I didn't like how it initially looked
As you can see from the photo -


I further extended the toes and made the toes wider and with some step-ish effect just for appearance sake ... I like it though.. kinda unique ...

I big the toe bigger and thus, I can't leave the heel alone... So I increased the side-to-side width only by a fraction and put in some very small amount of detail platings at the back of the heel-


Also, I was working on the feet and this hit me, the ankle is so poorly engineered that there is a huge gap once the ankle flaps are up. I was like UGH ..
So I decided to build this -


and this is the out come and WHY I made such a thing -


Now, even with the feet folding back, and the ankle flap open, it would be so ugly, and also, it will make the ankle more blended in, like a MG or a better engineered kit

Next, I put in some details in the holes I made on the lower leg...
You see, it was just an ugly hole when the the knee is bent and I was like '' UGH'' and I figured that has got to do.. so I decided to put in some vent-ish looking, mechanical looking part and here it is -

Now, as you can see from the lower photo, there is no more gaping hole when the knee is bent....

Next up, I was looking up the arm and I figured the front of the Bicep could use some details so I did this -

That's that for the arm, Im happy.. I still need to finish the shoulders though ...


I forgot ... I also made this -
Both Harry and Thelmos pointed out this and I had to fix this -


after that, I started forming the knee armour by closing the parts -


What's next is the start of the what Thelmosengine have been nagging me to update..... the Backpack ..

BEAR in MIND all of these are still in their infancy .. I still have so much to work on them ..

if you could recall, I cut up the back pack like so -


and I cut the boosters part further and I got this -


The big plates are glued on because there is a big gaping hole on those sides after cutting it away from the main backpack.
The black parts are scavenged from the 1/144 HG Bushido .. You all know how I feel about HGs .. anyway, those are the thigh parts from it
The Rod is meant to be some details like a pipe or something ... I will further detail it later on ....

Next, I made this... An adapter for the two boosters to attach to -


and yes, IT looks messy because I haven't finished it yet ..any way, that adapter allows the boosters to be like this -


Im still figuring out where exactly and How exactly ( as in, distance with the both, the angle and what not) to attach that adapter But this is test fit for all of you to see -

I think I might just go ahead and just glue it on to where I test fitted... Im not sure ... thinking thinking .. .

And here is another mock up of how the big dragoon will be placed -

I am trying to work out the final mechanic of how the small dragoons will attach to but I can at least say this, it will have an appearance similar to the Hi-nu BUT ( and a big but) it will be able to rotate all around so that the dragoons can be used to shoot at the enemy in a massive bombardment of beams, just like how the original backpack was intended.

Well, that's about it for today. Hope I do not disappoint you guys. If I did, I do apologize. I will make sure the next one won't be soo disappointing.
Please stay tuned for more and Thank you so much for reading, as always.

Read more >>

Friday, 30 March 2012

MG CrossBone Full Cloth Ver H.Bird

Hello dear readers, Fans, seniors and peers of the modelling world.

Welcome to another finished product from the hummingbird.

Just yesterday, I just posted my finished AGF and now, I'm posting another one. I'm on a roll. haha, but seriously, life has been crap lately that it feels awesome to be churning out completed kits.

Actually the AGF ( Astray Gold Frame) was finished latest. The Xbone was already finished like 2 weeks ago. I was just lazy to have a proper shoot. More like I wasn't in a good mood, TBH. Anyway, Since I was taking photos for the AGF, I figured I would have a photoshoot using my models as ''models'' (LOL).

Again, This kit is for the MAC Forum 2012 contest. Again, this is a kit to practice and to improve my painting and finishing skills. And once again, yours truly made so much boo-boos on this one ... ( What the hell is wrong with me???!!.. ).

Of cos, the chief motivator for this is Harry and of cos, Sneeper. Without their constant motivation and help, my painting and finishing won't be improving.

Nothing special to say about this kit except that it is OOB but with a custom colour scheme. The colour scheme is inspired by the greatest mecha (beside gundams, that is) of all time, the all powerful Gurren Lagann. I was browing around the net and I found a photo of a newly released toy of the G.Lagann and it hit me, '' I will paint the Xbone like the G.Lagann''. And here it is.

It is not perfect, yes, as you all know my painting and finishing skills sucks but I am glad this came out like it. I was aiming for a clean look but I changed my mind and I make the kit slightly weathered, to give it a slightly used feel.

I was having so much fun with the shooting that I took quite a lot of photos so be prepared to be bombarded by a massive amount of photos.

Here goes nothing - ( Please click on the photos for bigger view)


 I do apologize for dropping so much photos but I can't help it ... this is the most fun I have ever had taking photos and posing my gundams. I just want to share one form of creativity to the world, to my peers.

I hope you guys enjoy the photos.

Again, thank you Harry and Sneeper (Steve) for the motivation.

And of cos, thank you to all those who read and who have always supported me. Now I can focus solely on the Legend again... Im thrilled to go back to it after taking a break.

Well then, I bid you good day/night and please stay Tuned for more.


Read more >>