Showing posts with label Tutorial. Show all posts

Wednesday, 3 April 2013

A few words about Airbrushes from my good Friend


Right.. it has been a while since I have posted a tutorial but this is not really a tutorial but rather a sharing of some great ( and I do mean great ) points regarding airbrushes from an artist who does this for a living.

His name is Chriz Zeigler and apart from looking like a big mean ogre with huge shrek-like hands, he's a great guy and really great with airbrushes that have earned him the title, '' The Colour Whisperer ''.  Many of you guys who frequent to the Mecha Lounge Forum will recognize this lovable giant as Big Z. Do drop by to his company's page on FB here to check out his works, oh, and he also takes custom paint work order as well. So, if you have a motercycle helmet or something that need some sick paint work, he's the one to go to.

Okay... now that introduction is done, lets get on it ....
Out of the woodwork, he made a video giving out some great pointers for those who just got their first Airbrushes


So if you got your first Airbrush or still a noob in using Airbrush ...
WATCH THIS
I just couldn't stress it enough.....

You will definitely get clogged Airbrushes and you will need to maintain your Airbrushes in tip top condition. In the next video, Chris talked about how to do just that.


So you are , like me , still suck at maintaining your Airbrushes, you definitely have to watch this.

NEXT up, he made a video talking about primer and base coat. Speaking about primer, I made this particular blog post, resharing a great article. So many people asked the same dumb question without researching '' Do I have to use Primer?? ''... and the answer to that is , YES. Chris even mention that in this video as well so use Primer.


Now, those three videos should be able to make you ready for airbrushes. Many a modellers asked how to start using Airbrushes and said they are sacred of it and blah blah... but as you can see here, it is your greatest weapon. So use it as soon as you can afford it.

Well, then, that's it for this post and I hope What the '' Colour Whisperer'' said in those videos are benefical for you. They surely were for me, especially the very first video. All credit goes to Chris and don't forget to check out his works on FB or his finished model kits on the Mecha Lounge.

Until Next post and Happy modelling, you guys ......
Read more >>

Sunday, 24 February 2013

All about Primer ( Re-Sharing )


Since every starter has been asking the same question on the forums ( ours, The Mecha Lounge , included as well ), I figured I should browse the web and hopefully come across some nice article about Primer... and thank lord I found a nice one ...

DISCLAIMER - I take no credit to myself for this particular article, The actual article can be found here in this - http://www.scalemodelguide.com/painting-weathering/painting-guide/primers/
I am only sharing it here for all the beginners in the Gunpla field to benefit from their times on my blogs.

_______________________________________________________________________


Priming HalfordsIn the UK, Halfords automotive acrylic primer is very popular with modellers and readily available.  A  tin like this may be sufficient for several models.

Introduction

This article gives general information about putting a primer coat of paint on to scale models.  In particular, it considers the advantages and disadvantages of applying a primer.

Definition

First of all, let us be clear on what is meant by a primer coat.  The primer is the very first coat of paint on a model.  It goes directly on to the model’s surface (usually styrene plastic) and is completely covered by later coats of paint.

To Prime Or Not To Prime?

There are modellers who will always apply a coat of primer (or even more than one) as part of the painting process and other modellers who rarely, if ever, use a primer.  Others will be somewhere in between, using a primer on specific models.
There is no doubt that stunning models can be made without using a primer and priming a model will involve additional time and expense.  There is also a small element of risk involved as it is possible to spoil a model at the end of the construction stage by applying a poor layer of primer that covers fine surface detail.
With all these disadvantages and the fact that the primer coat is not even visible on the finished model, the obvious question is why would anybody bother with a coat of primer?

Reasons For Adding A Coat Of Primer

Primer Alien 3The primer coat on this figure revealed areas where the seam was still visible – marked with the red circles).
The main reasons for applying a primer coat are as follows:
  1. Showing up surface defects;
  2. Improve the adhesion of top coats;
  3. Reduce the overall thickness of paint needed;
  4. Pre-shading
Each of these will now be explained in more detail:

1. Showing Up Surface Defects

Getting a perfect surface without any visible marks or seam lines is essential for a professional finish on a model.  Painting a model rarely hides defects and, in fact, tends to highlight them.  Unfortunately, it is not always easy to see surface defects before painting.
This is particularly the case where fillers have been used and where the surface has been sanded leading to different colours and degrees of shine. A coat of primer gives a model a single even colour and consistent amount of shine that makes it much easier to see any surface defects.
This feature of showing up surface defects is very important in producing a top class finish and is of itself a good enough reason to prime models in almost all cases.  The same effect could be acheived by applying a top coat direct to the model’s bare surface (providing a single colour is applied evenly over the whole model). However, after the surface defects have been fixed, it would be necessary to apply another coat of the top coat, so the total number of coats of paint would be the same.
Alien pre primerThe front teeth on the Alien figure had to be completly remodelled using Milliput.  It was impossible to see how well they blended in with the rest of the teeth until the primer coat gave everything a consistent colour and texture – see below.

2. Improving Adhesion

The intention is that the primer coat will adhere to the model’s surface better than the top coat and the top coat will adhere to the primer better than it will to the model’s surface.  The primer coat grips well to both the model’s surface and the top coat holding it all together.  The fear is that without a coat of primer the top coat may peel off, or be easily rubbed off.
Primer Alien 1
Is there any truth to this?  It is certainly the case in the ‘real’ world in many situations.  If you try to apply a gloss coat to bare wood e.g. a door frame or skirting board, or metal e.g. a garage door, it will not adhear well and may indeed peel off or flake away.  However, in the modelling world the situation is not so clear.
Alien pre primer 2Above – The shoulder of the Alien figure was another area with a bad seam. Below – the primer coat showed the seam was not visible, but it did reveal a molding flaw that until now has not been spotted.
Primer Alien 2Modelling paints are designed specifically to be applied to plastic and most of the time will be a matt/flat finish with the rough surface naturally giving a good grip.  They are normally very high quality with good binders and very finely ground pigments.  The adhesion to both plastic, resin or metal and to subsequent coats is very good, so the need for a primer to improve adhesion is questionable.  In fact, the Vallejo websitespecifically states that ‘A primer is usually not needed’ for their paints in most situations (although Vallejo do produce a primer).
However, this has not always been the situation and modeller’s who have been practicing the art for a long time may be able to quote instances in the past when paint did not stick well to the model.  Paints available in the 1960s and 70s were generally not such good quality as those on the market today, so modeller’s who are a bit long in the tooth may have developed the habit of always applying a primer to improve adhesion when in fact, it may not be needed in most cases.  If a good modelling paint is used and it does not adhere well, then it is more likely to be the result of poor surface preparation rather than the lack of a primer coat.  Therefore, in most cases I would advise that applying a primer for improved adhesion of the top coat is not necessary and the best way to get good paint adhesion is to ensure that the surface is prepared properly with no traces of grease or oil.
One possible exception to this is where a gloss or semi-gloss paint is to be the top coat.  The shiny nature of the paint means that it is less likely to adhere to the shiny plastic surface and a coat of matt/flat paint in between the model’s surface and top coat might improve adhesion, although the primer coat does not necessarily need to be a specific primer paint.

3. Reduce The Thickness Of Paint

This may seem counter-intuitive.  How can adding a layer of primer reduce the number coats of paint?
The answer lies in the fact that most primers are very opaque i.e. they do not let the colour of the underlying surface through, and are neutral in colour.  If you have a model that is made of different materials (styrene, resin, brass etc.) or uses plastic of different colours, then you may need several layers of top coat to even out the colours of the different surfaces.  However, a thin layer of primer will give the model an even colour overall that can be then be easily covered by the top coat.

4. Pre-Shading

Although the primer is completely covered by subesquent coats of paint, it is not necessarily completely obscured by them.  The aim when painting models is to use as little paint as possible and the best results are often acheived by applying several very thin almost transparent layers.
By selecting a primer colour that is a darker ‘shadow’ version of the top colour it is possible, by careful airbrushing, to leave some of the primer subtley showing through the top coats to give shading that adds depth and interest to the finish.

Are Specialist Primers Necessary?

If you have decided to add a primer coat to a model then there are three options for choosing the type of paint:
1. Specialist Model Primer paint;
2. General Primer;
3. Ordinary model paint;
Many model paint manufacturers make their own branded primers and this is probably the safe option because they will have been specifically designed to work the the other paints in the manfacturers range.  These primers should cover well and adhere well.
Some modellers use general primers – particularly the acrylic sprays made for automotive use.  These can work well, are convenient and reasonably inexpensive (a large tin will cover several models).  Care should be taken not to apply a layer that is too thick.  A scale modeller will be trying to preserve as much surface detail as possible whereas car primer is intended to cover and hide any surface imperfections.
If one of the aims of the priming is to pre-shade the model, then the best choice may be an ordinary model paint provided it will give a surface finish that is matt/flat or with a slight sheen.  A paint that gives a gloss or semi-gloss finish will not make a good primer coat.  Unless the model’s surface is particularly difficult to get paint to adhere to there is no reason why a normal model paint cannot be used as a primer coat.
Scorpion mixed mediaA mixed media model like this one, with styrene, resin and metal surfaces, particularly benefits from a primer coat.

Chosing The Primer Colour

If one of the aims of priming is to pre-shade the model then clearly a colour that will make a good ‘shadow’ colour for the top coat is best.
When using a manufacturer’s primer then you do not have a choice of colour and will probably find that you will have to use grey or an off-white.  This is not problem since these make good primer colours.
If the final colour of your model is primarily light in colour, then consider using a light coloured primer and vice versa with a model that is dark coloured – this will help reduce the thickness of top coat needed to get the desired final colour.
HINT: If you have small amounts of paint left in pots that are unlikely to get used then you may wish to consider mixing them together to use as a primer coat.
If the primer will not be seen through the top coats then the primer colour to use is down to personal choice.  Grey or off-white are popular colours, being neutral and showing up the shadows of any surface defects well.  Perhaps surprisingly, black is also often quoted in modelling magazines as a primer colour although intuitively it would seem difficult to see surface defects against black (Tamiya semi-gloss black being a favourite of some).  Another colour used – particularly for aircraft – is silver.  Silver shows up defects well and as it mimics the natural metal surface of many aircraft, it can be left to show through the top coat in places to simulate wear.
All of this shows that the actual colour of the primer can be almost anything and it is getting an even mono-colour over the model that is of primary importance.

Summary

The original purpose of a primer was to improve the adhesion of the top coats.  This has become unnecessary in most cases due to the quality of modern model paints.  However, there are so many other good reasons to apply a primer coat that it is almost always done by serious modellers.  The only thing to take care with is to keep it thin to avoid obscuring delicate surface detail.
___________________________________________________________________________________
Many Thanks to Kris from scalemodelguide.com for writing this article so that I can spread the information further to our junior and fresh starter in this great hobby.
Until Next post. 
Read more >>

Friday, 28 December 2012

Everything I know about modding/SBing - Part 3


Part 3 of my '' Every Thing I know about Modding/SBing ' guys ... You can get to Part 2 from this link and Part 1 from Here .


DISCLAIMER - I am in no way a master in SBing or modding, there are so many others out there who can literally rape with me the amount of beautiful words they do. I believe in sharing and I want to bring out the best in everybody and help everybody in anyway I can. MAny Thanks!!!


5.0 Optional parts and accessories

So, optional parts and accessories. Obviously when we say about optional parts and accessories, one major product come into mind '' Koto Part ''. True you can always use koto parts as a reliable source but there are a number of stuffs that you can actually use from various cheap materials like straws or used up ball pens or lighters or even computer mother boards.

People actually spend money on buying koto vents when they can SB those little things themselves. I SB my own vents on my very first modding project ( WIP here http://modeller-innovation.blogspot.co.uk/2011/03/improving-hg-1100-nataku-part2.html ) so I'm pretty sure anybody can SB their own little vents and can save money on both the products and postage buying the koto vents. I would love to link you to other masters' works where they SB their own little vents but my bookmarks are a shamble right now and its very very hard to find out which book mark is which so I do apologize  But my wip can be used as a basic mean of SBing your own vents

Pistons; static or moving piston, pistons (also called hydraulic cylinder) can be easily put on if can get your hands on a pair of telescopic tubes. You can use Tube/Tube or Tube/Rod combination, either way is fine as long as your smaller diameter rod or tubes goes nice and tightly into the main body of the piston. Evergreen has a wide range of telescopic tubes in the category so I would recommend buying it from them. I say away from moving piston as it is so much work so please forgive me if I don't link any wip for that but for static piston-; you can have a look at these two pictures - http://i1001.photobucket.com/albums/af133/hummingbird2012/MAC%20concept%20WIP/piston.jpg and http://i1001.photobucket.com/albums/af133/hummingbird2012/MAC%20concept%20WIP/P1050067.jpg

Thrusters; We can always buy the Koto parts and now bandai making their own stuffs but the more adventurous modellers use the little conical parts on the front end (don't know how they are called) from used-up ball pen (either plastics or metal). I have seen people putting on the metal ones and they actually looks very awesome.

Wirings, cables, piping - DO NO throw away your broken Earphone because they will become very very useful when and if you ever want to put on pipes or cables on your models.You can also use flexible plastic ( styrene ) rods as well but if you are putting the cables/pipes on moving parts, I would recommend using the broken ear phones as they are very flexible ( sometimes too flexible so be extra careful ).

Spikes - I have seen some people use 'TEE' ( golf equipment) and they work quite well although I have no idea how economical they can be. I tend to use various diameter sizes of Wood Skewers. I cut just the spike off, attach it to my power tool and sand it down at an angle relative to the spike to a 400 grit sand paper at medium speed and I got a very nice looking spike.

I think that's about it when it comes to optional parts. Bear in mind those are the ones that you can scratch build. Some of those stuffs like the round mold or square mold are VERY hard or impossible to SB so I can only recommend buying them from the Koto part.
If I miss anything at all, do tell me and I will add it up but right now, That's all I can think about on top of my head. ( Actually, I am not really happy cos I know I could add more to the list. If you guys can think of anything that I am missing please tell me )

Thank you all for your support and reading my humble blog. Stay Tuned.
Coming up next - 6.0 Funtional mods and gammicks
Read more >>

Wednesday, 26 December 2012

Everything I know about modding/SBing - Part 2


Alright, lets pick up where I left off from part 1 (in case you want to refer back to part 1, link is here ). Sorry it took me quite a while to write this up.


DISCLAIMER - I am in no way a master in SBing or modding, there are so many others out there who can literally rape with me the amount of beautiful words they do. I believe in sharing and I want to bring out the best in everybody and help everybody in anyway I can. Many Thanks!!!

4.0 Tools
Obviously, I don't need to say '' use a hobby knife'' as it is the first thing you would need to pick up whenever you start modelling.

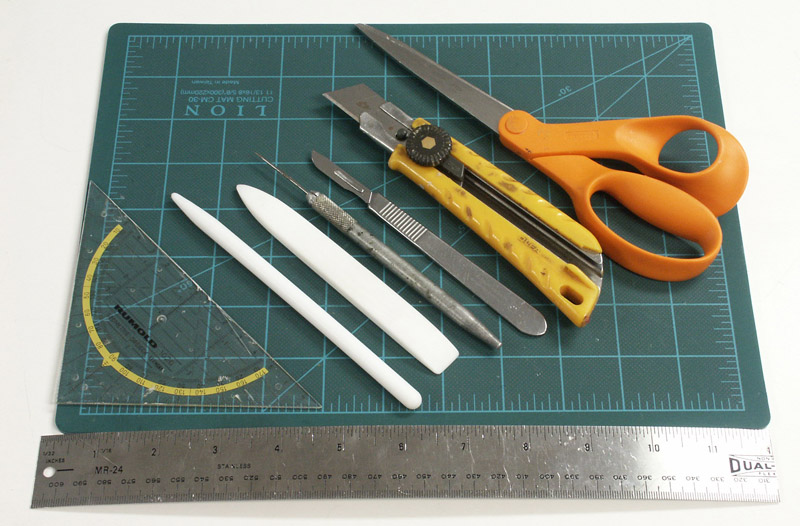
Hobby Knives, however, comes in various kinds of blades and handles and it would really benefit you if you could invest in a set like 
this. The reason being that different blades have their different use, for example, the blade that look like a chisel ( I'm talking about the square one, third one from the left) is very useful if you need to cut away short pieces. Usually, if you overshoot something and need to cut, you use your ruler or whatever you can find, line up with the ruler, and run your knife along, which can and will result in too much force pushing the ruler away and your line of cut will be all messed up and you got a knife mark going all wobbly instead of a straight line. With that blade, I just mention, you just line up with a ruler, and just press down the flat blade down, and voila, hassle free cut.

Saws; Saws are your allies. Seriously, when I cut anything above 1.00 mm, Saws are the best to cut through them in short time while saving you the hassle of exerting too much energy. Before I invested in saws, I use my hobby knife to cut a 2.0 mm plate and OMG, it took forever and my fingers were almost blistered. With a saw, it’s just ''zig zig zig zig ( saw noises) ' and ''snap'', a nice cut.
Like knives and blades, saw comes in a great variety of forms. Quite a lot of Scale modellers who build those massive 1/32 airplane kits tend to use these 
kind of saw when they have had to cut the plane’s wings or fuselage or whatever. Personally, I think that's over kill; I mean look at it, you could kill somebody with it.  For gundams( Gunpla), this size of saw is more than enough to do the job. And lately, I have fallen in love with this particular saw ( from Trumpeter ). 

I don't think I need to say anything special about Sand paper as everybody knows how important they are. To be honest, I am still a noob when it comes to sanding, but I can say this, go to a DIY shop and grab from at least 400 all the way to above 1000. The more variety you have, the better. For me, I have 400, 600, 800 and 1000. I even have those sandpaper the carpenters use which are like 100  grit ( I think). Dang those things are really really coarse but quite useful if you need to do heavy sanding on two part epoxy. It would also be beneficial for you to invest in a set of file as well. I have this particular 
set of files and it really helps. It has a triangle shaped file, square shaped files and other shapes which I just can't describe (LOL) that will really really help you with sanding hard to reach areas and what not. 
Or if you are lazy and there is a large amount of sanding or you need to sand the inside of the tube (Concave surfaces?!?!?), you can always use a trust worthy power tool and a sanding bit.

Power Tools: ah, another very useful ally to us modellers. Without it, I don't think I could have even finish some of my kits. This little 
thing has been with me for 3 years and really really helped with me drilling through thick parts, cutting very very thick part, sanding down massive amount of epoxy.  It comes with as you can see from the link but you can also buy more bits (not the 00 universe bits, I mean the heads that you put into the machine). Every time I do some heavy amount of joint mod, I use this little thing to do some heavy duty drilling.

Rulers: Until about 1 and a half year ago, I always use my left over rulers I bought for my university, u know those two part rulers with one clear side and one dark white side. And seriously, plastic over plastic, the darn thing always move when I’m doing precise cutting. So I was ticked off, got off and went to a art store ask for a fine metal ruler that artist used. From then on, I just kept using Metal Rulers and I seriously Suggest using them.

Divider and circle cutter: They are your one of two options if you have to cut circular parts or some properly beautiful curved plates/plates/shape. I don't think I need to link what does a divider looks like (LOL). The other option you might need to invest in would be a simple, Circle Cutter like 
this .

Measuring: Most of the time, we use just our eyes to measure a approximate and then just use our rulers to measure it. That works, yes, but from time to time, when it comes to precise cutting, going on with that method is a royal pain in the butt ( not literally, mind you) and not to mention it hurts your eyes from them being strained too much. In that case, VOILA, A digital calliper comes in mighty handy. You don't really need to get an expensive one, just get the one that's work and it should be fine. 
Measuring angle is a major downer and most of the time, I always come up with some crappy angle and had to re-do stuffs 2, 3 times. It can be easily avoided with the thing every school children use (I think every school children use them); A protractor. For me, I use a metal protractor; that kind that sailors used (I stole it from my brother.. hahahah). It really helps make a difference. 

Well, that’s what I can think of, at the top of my head, regarding tools. I may be missing something and If you do find out I’m missing something or forgetting something, please tell me and I will put it in.


Read more >>

Tuesday, 13 November 2012

Everything I know about modding/SBing - Part 1

 
 Hey guys .... I haven't been able to post blog these days as I was busy during the months of October. I do apologize about it. Long Story short, I have to do 12 hour shifts last month and those shifts left me exhausted that I just can't bring myself to blog.

Basically,one of the member of MechaLounge sent me a PM, asking some questions about Modding/Sbing so I thought it would be nice to make a thread that every one can have a look if they anybody want to refine or start modding/SBing


DISCLAIMER - I am in no way a master in SBing or modding, there are so many others out there who can literally rape with me the amount of beautiful words they do. I believe in sharing and I want to bring out the best in everybody and help everybody in anyway I can. MAny Thanks!!!

1.0 Concept

Basically, the most common question I get and I see around on the forums is this - '' How do u Scrach build something ? '' or '' How do u mod? '' or  '' How do I learn modding? ''

and my reply those kind of question is this -
''' The only option to do it is to learn by looking at how other people works and getting the general ideas and finally getting your own concept, and start working on yourself which at that stage, you can specifically ask how to change a specific part ...
We all learn to do this ...
Browse through the various threads and see how each person works
There are some basic-need-to-know stuffs about SBing and modding in the tutorials sections too ....
Above all, What you will need is - your concept, a good eye to catch what other peoples have done, and no fear ... ''

Not to mention one crucial thing Aulon pointed out - '' The Idea '' ..
The Idea is the most important, IMO, only by knowing your idea, you will know what you want, and only by knowing what you want, you can narrow down your search ( if you got stuck ) and start building.

And that is no joke-  It's all about knowing what you want to mod. Ask questions of yourself. Like " is this part necessary here? " "Maybe I can remove it and put something better there? " or just finding a style you like.

and also, when people ask ' how do u SB something '' , All I can reply is -

'' You're asking a very very very broad question mate ....
I have been in this hobby since 2007 .. there is no such ''specific'' tutorials such as '' How to SB Something''
We all have to learn from other people's wip and see how they make them ...
BUT what you can find is some basic ''how to '' ( ''dos and don'ts'' ) tutorials that can help you SB ...
and SBing also require your initial concept/designs .....   ''

As you can see, the answers are quite similiar and everything goes back to the important thing, ' idea/design/concept'

2.0 Cutting pla-plate/Poly stryene


The other kind of question Which I see quite often is '' How do u cut pla plate ''  or a follow up to that '' How do u cut it identically/neatly? '' ...


here are some tutorials about pla plate cutting....


http://forum.zerogunz.com/viewtopic.php?p=88355&sid=a4a3e7479fdc2bf0b71887044b13c581


http://heathorn.wordpress.com/2010/03/06/plaplate-cutting/


http://www.starshipmodeler.com/tech/cj_scribe.htm


For cutting identical pieces, the most effective weapon is ''Double Tape.
Another method is to use kamm's method; to drop a very very small droplet of glue right in the middle of the piece you want to duplicate, then glue it toa plate, wait for it dry, cut the shape along the edges of the first piece, and after cutting, check if both pieces are identical, sand if needed and just drive a hobby knive down the seam in the middle, slowly does it as you only want to cut it open by cutting away the glue.

I couldn't find too much about tutorials on that topic but when it comes to research and references, you know me ... so will keep searching...


3.0 MG-fying, improving articulation etc.

Another Kind of question which I also see from time to time is the usual  ''' How do u improve this part's articulation '' or in a whole '' How do u go about MG-fying a old kit '' -

I'm not sure if this can be universal but i make up my own set of things to look out for if you want to mg-fied a kit -
1. mobility of the arms (that included the shoulders)
2. mobility of the neck
3. moblility of the waist
4. mobility of the skirts
5. mobility of the legs ( included the knee joints, ankels and thighs too)
6. extra details
There are alot of example out there... and even my own works are done by researching and reading about what I want to do, what i can do with my current skill level, and never forget to checkout the other great guys' works...

for mobility of the arms specificilly, you can check out my own wips... or you can check out this
site .. That is my VERY first WIP that I studied to get a MG elbow... This is also what i refer to.. You can get a general idea from that ...

I learned a thing or two from
here too
another
one of Derringer's works that I believe is helpful this should help too
i did my reserch from
here too
This
DSHC is one of my '' have to go look and learn '' piece.
Same goes for this
Freedom if I need to do more research

Nowaday, too many MGs are coming out true BUT there are still some people who enjoy improving OLD kits ... ( LIKE me ) so this is for those who enjoy making old HG and NG kits into a beautifully articulated one .. ( so please refrain from dropping comments like '' what's the point when there are many MGs out there, blah blah blah ).


Okie, its already long enough for the first part and some paper work came up (im at work now) so I will stop here. In part 2, I talk more about Tools, and Accessories so Stay tuned.
Thanks for reading.

P.S, If I missed anything that should have been included in this post, please do tell me. Thanks.
Read more >>

Friday, 11 May 2012

How to Hand-Paint Mecha/Gunpla

Greetings my readers and my fellow modelling enthusiasts. Welcome to another post from the hummingbird.

First of all, I would love to apologize for my lack of update on my blog. 


Its just that I have been jobless for the past year and now, I got a job .. ( well, its only a hotel receptionist job and its kinda feel awkward for a material science grad to be doing this kind of work but what can I do in this time :/ ) and I was busy with training and the manager keep giving me shitty rota that I can't even touch my models any more but don't worry, I haven't quit the hobby yet. So, Sorry for the lack of updates.. I will update after I have adjusted my life.. 


Right, onto the main feature of this post ... I would like to feature a video from a  dear friend who is also brother from another mother and also a leader ( when we play online games). And that said person is no other then Mr. Kamm, the Hand Painting Assassin himself. 


As you all know, Hand Painting Assassin paints all his models by hand brush and he has generously made a video tutorial about how he hand paint his models. 


Without further ADO, I present to you, ''' How to hand paint Gunpla/Mecha ''' tutorial from the Hand Painting Assassin himself.... So do enjoy .. .and don't forget to like, comment or subscribe to Kamm's channel...... 


Hope that was helpful to you... it was helpful to me.. but sadly, I have given up hand painting... :P ....
Hope you enjoyed this giant tutorial from a great modeler ( and a great guy to boot) ...
Don't forget to  like, comment or subscribe to Kamm's channel...... Stay Tuned until next post .


Read more >>

Friday, 10 February 2012

The start of a legendary tutorial


Hello and welcome to another blog post from the hummingbird.

First of all, I would like to say sorry for my lack of update on the blog, I have hit a wall and my mojo was just dropping, all time low.

Now, is a prime time to blog about a up and coming series of tutorials from one of he Legend of Decay ( you can argue about Decay's being the Legend of MAC as much as you like, but seriously, he is one ).

As you all know, Decay has decided to make an 3 hour long, fully detailed and fully explained tutorial on painting mini figures, such as those of the Warhammer series.

Here is the very first video that I speak of -

Now, you might argue why his tutorial should be featured like this and blah blah blah. Right, I have everything I need to counter that.

First of all, this - (the Link to this is HERE)
is hand painted entirely..... and not to mention Decay has been modelling for a total of 20 years and he has been painting Warhammer figures back in the days so nuff'said, I guess.

Just in case, there are some people who don't know about this Awesome modeler,
here is the link to his blog - LINK

and here is some facts about him -

  • Decay has been modelling for over 20 years
  • He only started working on Gunpla for a mere two year
  • Decay was only scarcely active at figure FM once
  • He became an active member of MAC as soon as he register
  • He now hold the Meister status in MAC, which is a moderator level
  • He hails from Germany
  • And best of all, A very very very good friend of mine.
Decay is a very skilled modeler, doing a range of modeling including painting figures, clean works, diorama, weathered and the ever impressive modifying works.

And here is a re-cap of some of his works I have featured -

For the mini figures he painted, you can check out his works in his blog.

Well, that's that for this post. Be sure to subscribe to his channel, like his video, u know, do your stuffs what you normally do on Youtube. 

Till next update, Stay Tuned for more.
Read more >>

Monday, 19 December 2011

Using Support for Structural Integrity

Hello, Hello, ladies and gents - The hummingbird is here with another tutorial ( if you could call this tutorial) for easier scratch building and for structural integrity of the scratchbuilt parts. And that, ladies and gents, are achieved by using supports, just like using girders when a building is being built.

A word of advice before going on, my method ( just like all and any other methods out there) is not THE way to do thing. It works for me and I wanted to share this with my peers and most especially, the juniors in this hobby. You are more then welcome to experiment with this method and tweak it around and come up with your own or use it to how you see fit.

Alright, Lets get cracking.

As you may all know, structural integrity is important. I mean, would you want to see your SB parts buckled or snapped off due to weight issue, not currently alinged... so on so forth, after such long pain staking hours working on it and at the end '''' uh-uh ''? I seriously don't want to. I would go on a rampage if that happens. Now, that's where and when ''supports'' come in. Trust me, it works wonder.

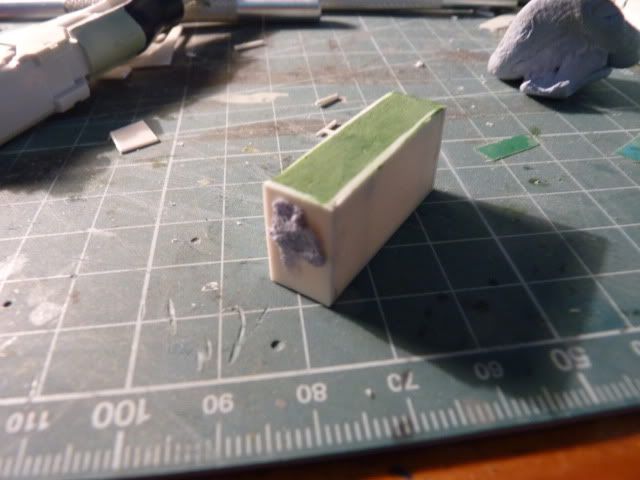
Lets take a look at this picture for example.


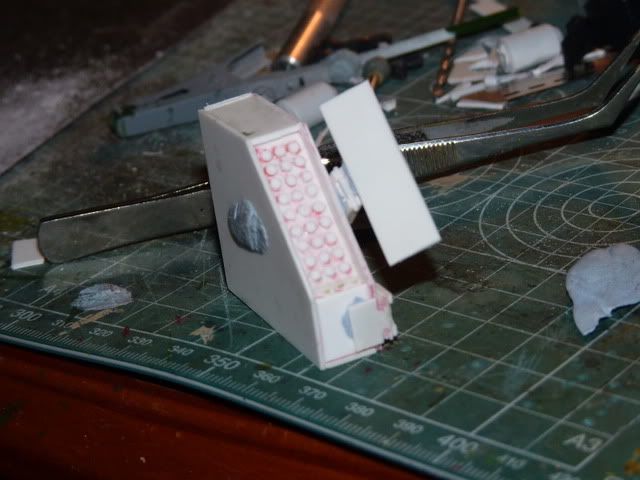
This is nothing more then a simple box, yes ? Now, you might be wondering why I am showing you guys this ...... The Answer is right in the next picture..


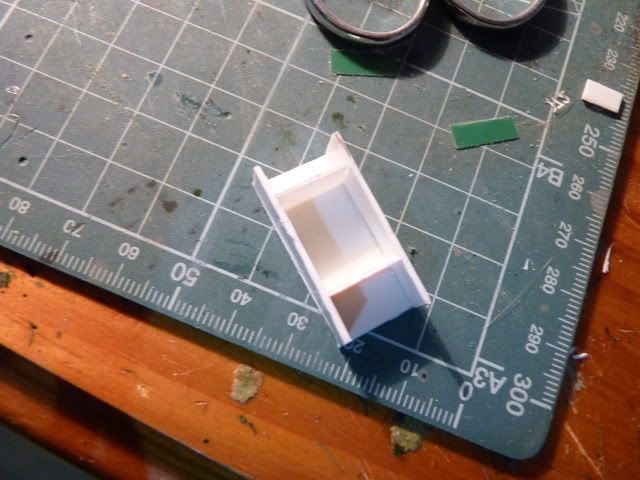
VOILA .... AS you can see, I put in two supports across the ..eh.. length??!!!??... ( anyway).. across the two sides .. before closing of the top and base and one of the sides. That, my friends, IS the support system I am using.

Now, I will give a details brake down of how this support system is useful. Lets take a look at the picture below -

Right, as you can see, that picture is from one of my wips where I was using the support system to its fullest. I wanted to shape the general cockpit idea of the concept mecha and I did this to start the process of building the body. Right, as you can see, I have put in two supports, support 1 and 2, clearly indicated by red arrows. Now, do you see the pink line with the caption ''Part A '' ?? Right, just at the end of it, are some pegs from the scrap parts of the HG S-gundam I'm using. One Could Argue that I could just simply glue the plate ( part A) on those pegs at that back. That is true yes, I could, but that is also wrong. Of cos, that same question comes into my mind and I have tried it and it was a utter failure. The little plate glued on to those little pegs cannot hold the weight of the Canopy and it was wobbly, in addition to the canopy bending down. Hence, I took it off again and put in Support 1 which is a direct support between the Scrap Part and Part A, holding the weight of the canopy and Support 2, at a diagonal, to brace the weight and also to support ''1''. And voila, no more wobbly canopy, solid and stiff and firm. 

Lets take a look at another photo - 

This is what using supports has given me. Again, I could just glue that slab inside the chest but doing that won't guarantee complete stability and with posing and futher handling, there will be a failure ( a failure as in breaking, snapping, etc).  Lets take a look at another picture.


Right, in this photo, you will see that I use supports for two reason - (i) for integrity and (ii) for shaping/forming. 

(i) At the top photo, you will see side A and Side B, yes? Right, those two are basically glued , as you can see, on the sides of the scrap body part and glued along the length of the top. If I hadn't put in a support between them, the mere appliance of force on those two sides ( side A and side B ) will dis-lodged them, make them deform under force, etc. Now the most important thing to remember on this is that you would want a exactly measured length of support between them, as you don't want the two sides to be at an angle but rather completely straight and flat and parallel to each other and perpendicular to the scarp part. 

(ii) Right, for the bottom pictures, its simple. you just put in a exactly measured length, ( exact measured on all four sides). You would want the supports to touch to the back of the canopy and also to touch the back angled part also, you would want the width of the supports to be exactly as the one that you see on the back. that way, when closed up, you will get a nice firm, solid and stress-resisted ( up to a certain level of cos, I mean, you're squeezing this with a hydraulic press or anything) shape or parts. 

Another great example of the support system can be found here in this next photo ..

This pic is carefully labelled so I don't think I need to explain further more.

Well, that's about it . That's as much as I know about supports. Again, I stress, my method is not THE method. You can use it, turn it the other way around, or even come with up a better version based upon this. You are, in fact, welcome to do so and If you do, please tell me too, so that I can use your improved methods too.... LOOOL.. 

I hope my juniors and peers who want to delved into the world of scratch building find this tutorial mighty useful. If you have any questions or need further explanation, please do not hesitate to contact, I will be more then happy to help out.

Until Next post then. 

Stay Tuned for more.

Read more >>

Wednesday, 28 September 2011

Making hinges Part 1; without the use of telescopic rods

Hey guys,, this is a 2nd tutorial from the Hummingbird.

Imagine you want to make a missle launcher with the missle bay door swinging open to revel the missiles inside??
That is quite complicated, no? The bay door swing open and closing and hinges and everything....

something like this
Posted Image

Well, not really complicated anymore as a hinge can be make (and made successfully) simply by sandwiching pla-plates.

This is part 1 and this will be done without the use of telescopic rods. In part 2, I will talk about hinges made with the use of telescopic rods .

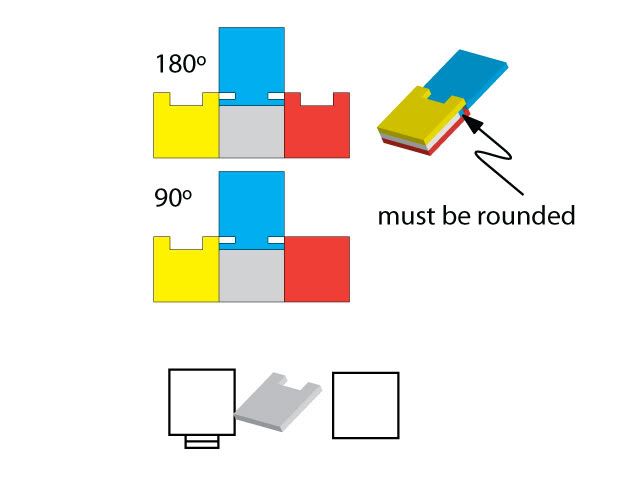
First, lets look at this basic schematic that my mentor and idol MatX posted for me when I asked him how to do it ..
Posted Image

That is basic schematic and what MatX told me and I quote -

If you don't have pipes and round beams, use 1mm plaplates, cut to size (follow the guide) and trim appropriately as indicated. You must round out the hinge part. Since this part is rather small, the "peg" will be too soft so be careful, dab a little thin cement on the hinge part and let cure for at least 6 hours to give it rigidity. Once the hinge is assembled it should be okay.

right, lets move on to the actually making of the hinges ....

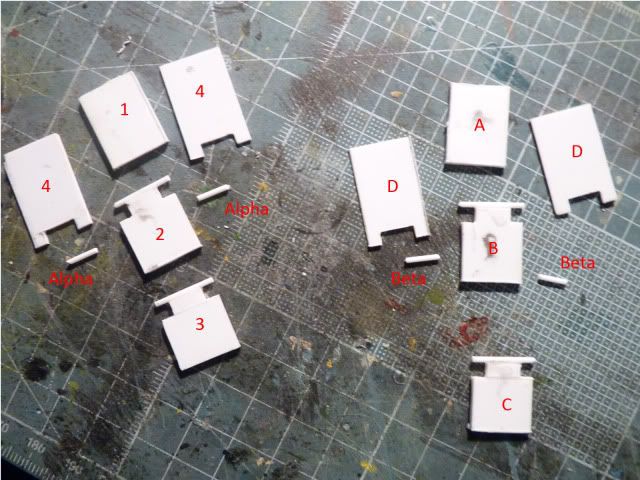
First of all, you might want to cut your plates into this kind of configuration ( lets name this image 1)
Posted Image

Since i was using a big piece and a rather thick plate, 1.5mm, i didn't want to cut the no.2 plate into the one indicated in the schematic, thus, I cut the sides out and glued on a rod.
If you don't have rod, cut out the plate like so in the schematic and sand off those pegs to have round surface. I have done both method and I will talk about both.

Right, after that, you have to cut plate number 4 as you see in the picture. Make sure to cut it properly to accommodate plate no. 2's ''T'' area. Try to see if number 2 ''T'' fit on number 4 ''H''. You don't want it too tight, nor too loose.

Pieces Alpha and Beta are not compulsory as that concept would be very hard to build in small hinges. Again, I have try both configuration and I will be talking about them.

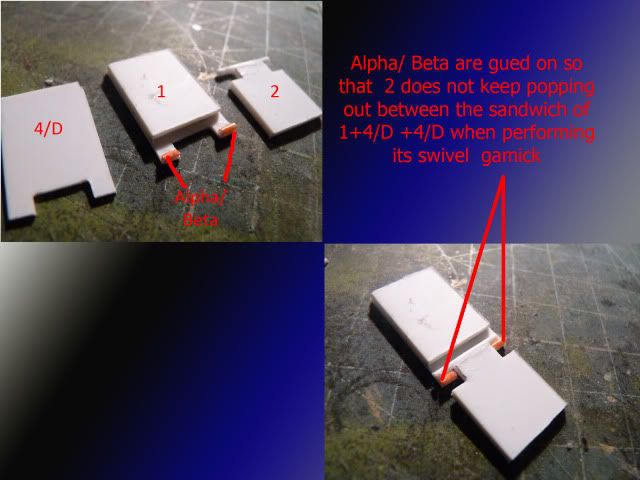
the purpose of Alpha and Beta can be seen in this photo - ( this would be image 2)
Posted Image

Part Alpha is there so that when the hinge is swiveling, plate number 2 would not detach itself from the whole sandwhich.
And after cutting the plates you see in image 1, you assemble the plates as you see in image2.
In Image2, the other plate 4 is purposely left un-glued for tutorial purpose.
Part Alphas are glued at the edge of one of plate 4 so that when the other plate 4 is glued onto plate 1, the ''T'' part of plate 2 is locked as a hinge in the whole assembly.

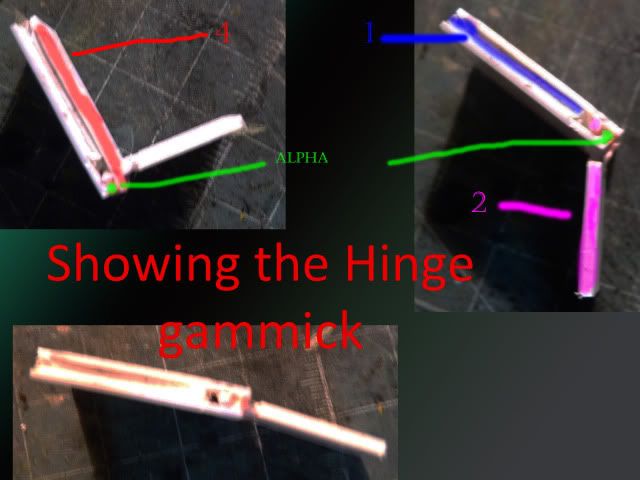
Gluing the other plate 4, you will get this -
Posted Image

This set up is rather easy as the plates are large, thick and the actual rod is there serving as a real hinge, thus, resulting in smooth motion.

In another way, small hinges are rather hard and more tedious.
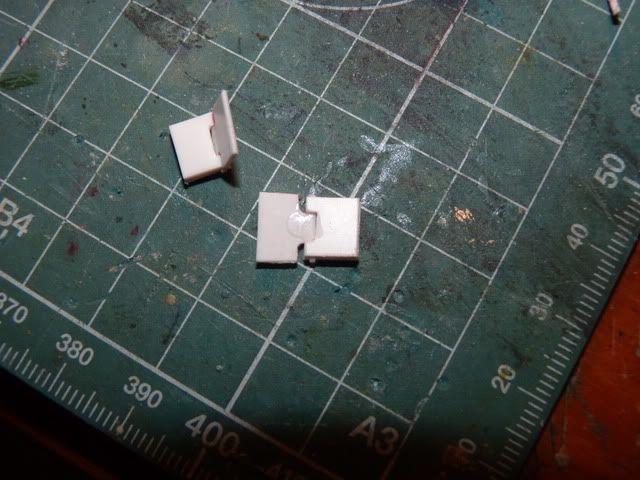
Here in image 3, you can see the very small hinges i made -
Posted Image

since those are really really small, its very hard to make into a smooth swiveling hinge but it can still serve its function as a hinge....
as it can be seen from image no. 4
Posted Image

How can it serve its function without a smooth swivel ??
well, since the ''T'' are rounded, even if it can't swivel smoothly, you can always take off the whole thing and re-insert it in as a swung hinge.
In this configuration, part Alpha can't be incorporated as the hinge it self it just too small.

Well, that's it for this tutorial. I hope my explanation are understandable and hope this helps everyone.
IF you need to ask anything, pls do so.

Thanks for the support.
Read more >>

Tuesday, 28 June 2011

Stacked Stairs Method part 1; Making 3D and 2D shapes by Stacking

Hello, guys. This is my very very first tutorial so please bare with me if I made mistake or sounded like a douche :P. Anyway, as you all know, the world of modelling is now filled with great many masters, people who can literally Scratch Build a Mobile Suit out of plywood ( bit exaggerated). The greatest newest innovation to modeling in the Gunpla community was the usage of plexiglass. It was made first and foremost by one of us, which I am so proud to present, a modeler by the name of Gravewolf of MAC. Now, scratch building has taken a tremendous leap, and I know ( as I myself evolved from a lurker in forums and an admirer of the great works of MatX, Juju, Don and etc.) that more and more people are taking up this hobby which we treasure above all other hobby. And those ''juniors'' will be wanting to mod, inspired by those great models out there, but they will be discouraged by the hardness of scratch building. I write this tutorial for their sake, to help the juniors as much as possible and to share my techniques to the world. Alright, that's enough intro.. lets get on it.

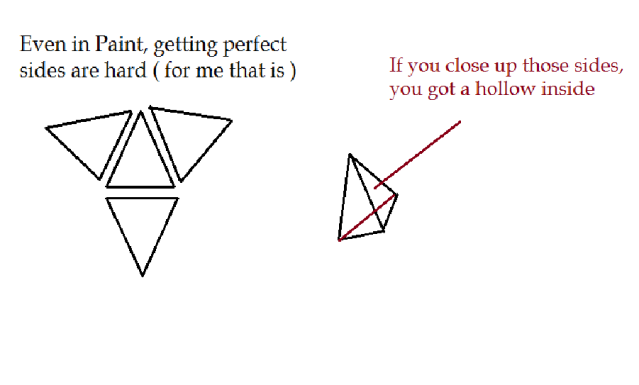
I name this ''Stacked Stairs'' method as it involves stacking plate and making a stair with those plates. Imagine a 4 or 3 sided pyramid, and imaging trying to scratch build one. Your option is pretty much using putty cos making such shape with plates is hard, as you need to measure carefully the exact size, the exact angles, and duplicate up to 4,5 plates to achieved a perfect symmetry pyramid. But the problems doesn't stop as when you glue those pieces, the inside will be hollow; I guess this picture should help explain things - 

Posted Image

And trust me, you don't want a hollow object with low structural integrity, you literally can't do anything with it as it will keep breaking with force. Now, with stacking plates together, both shape and integrity can be achieved.

I will, firstly, be explaining on a simple 2D slope..
Picture any slope you want to do... simple slope, (inclined surfaces)... if you got it then cut to desire shapes
Me, i will be working with this ..
Posted Image

make sure to cut the pieces progressively smaller.. the actual length on how much to cut is of course, up to you.
And don't forget that depending on the angle you want, you might want to watch out how much you want to make them progressively shorter.
For example, you start with say, 10 mm, then you make the 2nd 9mm, and progressively cutting off 1mm with each plate, you will get a pretty steep slope.
Again, say you start with 10mm, and you take off 2-3 mm with each plates,, you will get a pretty inclined plate.
Precise measurement is preferable but not really crucial.

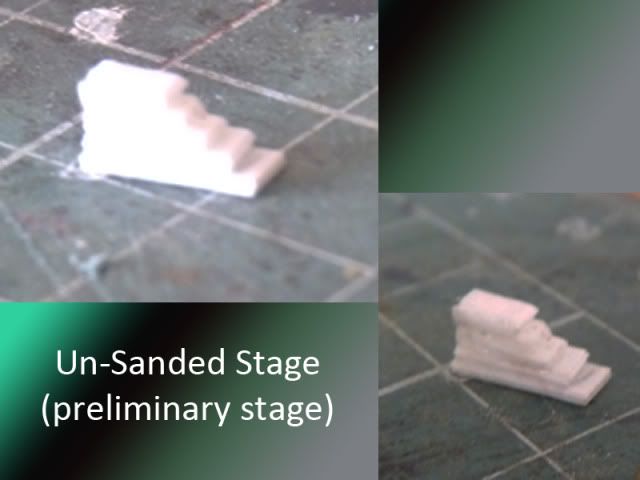
Ok, once you are happy with the size and length, stack them like so
Posted Image

this is a simple Slope if you can stack with the other side uniforn, you will get a pretty nice slope...
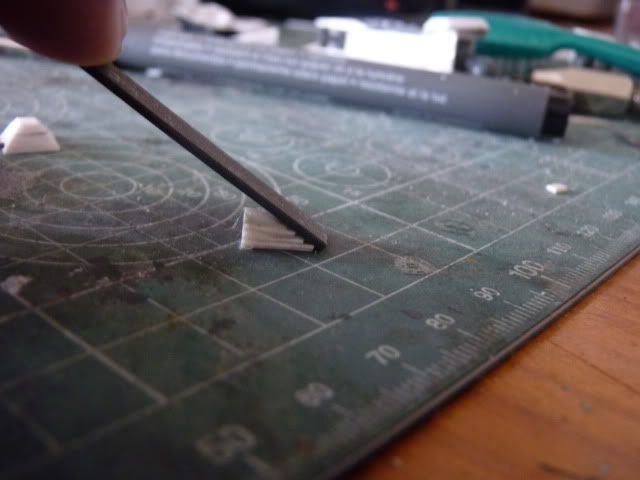
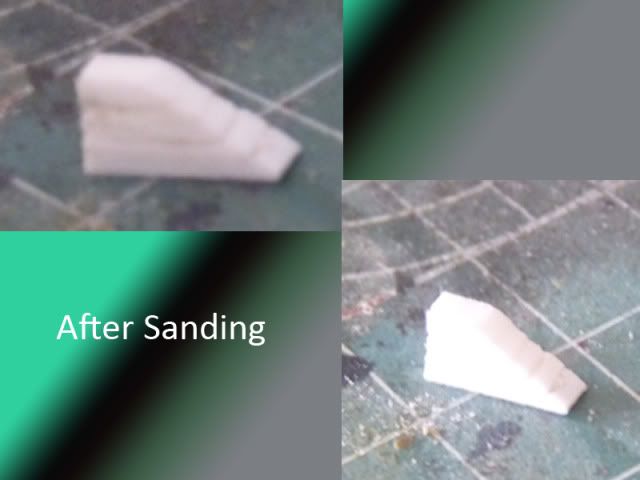
next, sanding...
Posted Image

besure to sand it down according to the angle you stacked...
and sand it .. and you will get something like this
Posted Image
of cos, being humans, we will have errors.
But those can be easily fixed by filling with puttin and sanded down for the putty to blend it should be fine.
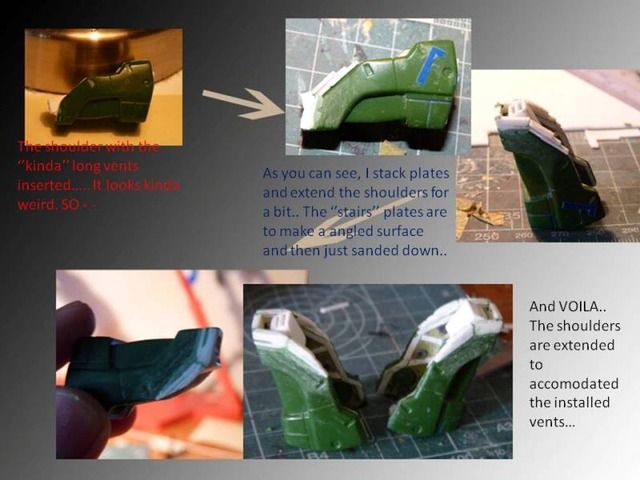
that's how i got the shoulders of my Nataku..
Pictured here
Posted Image

right that's the simple slope covered.. next, i want to talk about a pyramid shape..
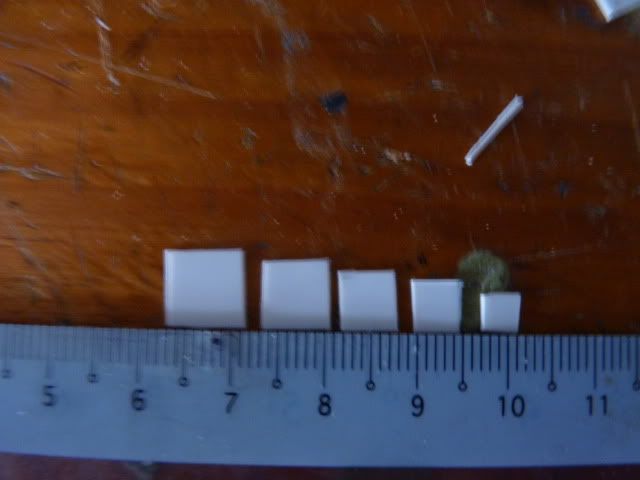
same steps... but you might want to be more precise with the measurement..
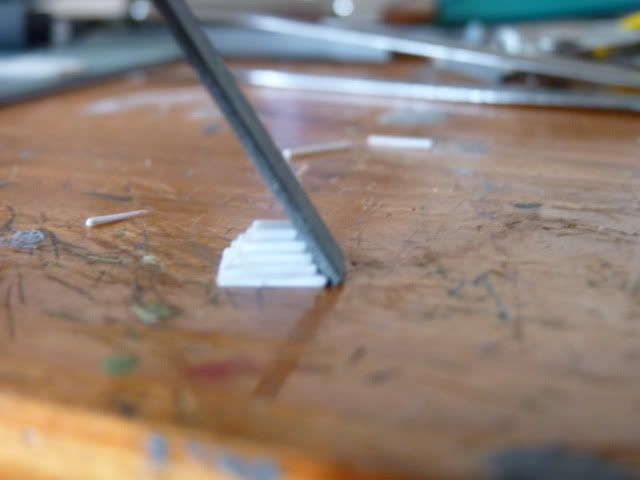
i started off with 1x1 cm
Posted Image

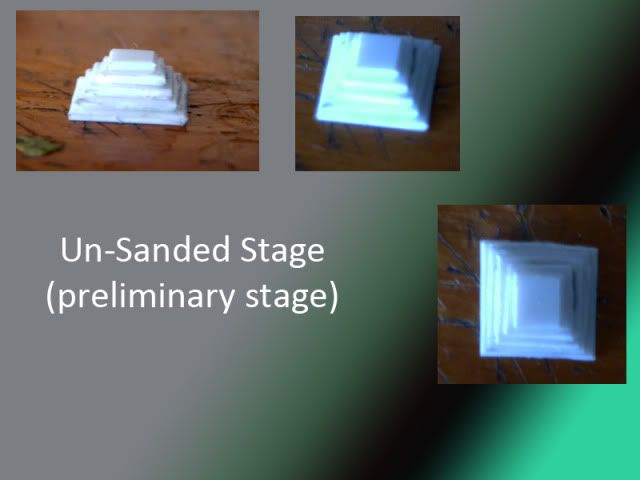
now since this is a pyramid, you would want the smaller pieces to sit directly in the middle of the bigger one
Pictured here like so .
Posted Image
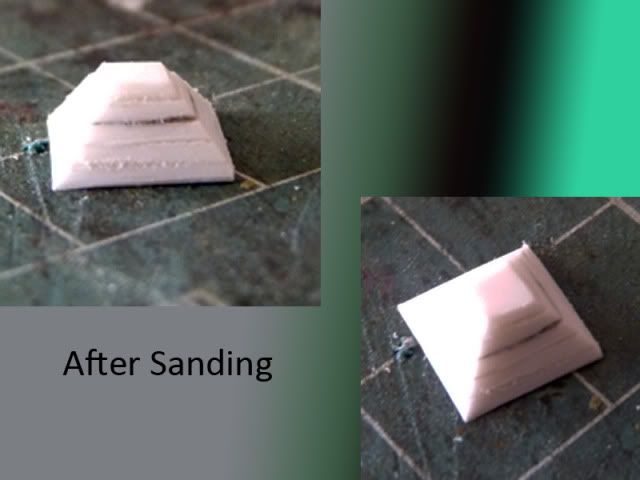
right the usual, sand
Posted Image

and after sanding you will get this ..
Posted Image
again, check for error and filll with putty if needed....

well, that's that... I don't know how effective this will be with other but this works wonder for me. This is part 1 and I have covered simple slope and a basic 4 sided pyramid and in part 2, I will be covering more faceted shapes. Thanks for reading and Stay Tuned. 
Read more >>